研究consul的service mesh功能
文章目录
之前一直是将consul当成一个服务发现、分布式KV服务、服务健康检查服务等,不过前几天consul发布了1.2版本,宣称其实现了Service Mesh方案,最近在做Service Mesh相关的工作,正好有一点时间,就花时间研究一下。
试用consul的service mesh
升级consul至1.2版本
macOS下升级consul很简单,简单用brew命令就好
brew update consul
为了方便后面修改consul的配置文件,添加一个-config-dir参数
/usr/local/opt/consul/homebrew.mxcl.consul.plist
<?xml version="1.0" encoding="UTF-8"?>
<!DOCTYPE plist PUBLIC "-//Apple//DTD PLIST 1.0//EN" "http://www.apple.com/DTDs/PropertyList-1.0.dtd">
<plist version="1.0">
  <dict>
    <key>KeepAlive</key>
    <dict>
      <key>SuccessfulExit</key>
      <false/>
    </dict>
    <key>Label</key>
    <string>homebrew.mxcl.consul</string>
    <key>ProgramArguments</key>
    <array>
      <string>/usr/local/opt/consul/bin/consul</string>
      <string>agent</string>
      <string>-dev</string>
      <string>-advertise</string>
      <string>127.0.0.1</string>
      <string>-config-dir</string>
      <string>/usr/local/etc/consul.d</string>
    </array>
    <key>RunAtLoad</key>
    <true/>
    <key>WorkingDirectory</key>
    <string>/usr/local/var</string>
    <key>StandardErrorPath</key>
    <string>/usr/local/var/log/consul.log</string>
    <key>StandardOutPath</key>
    <string>/usr/local/var/log/consul.log</string>
  </dict>
</plist>
这个配置文件中,我添加了以下两行:
<string>-config-dir</string>
<string>/usr/local/etc/consul.d</string>
写两个模拟的微服务
用golang写两个小程序,用以模拟两个微服务。
service1.go
package main

import (
	"net/http"
	"log"
	"io"
)

func TestServer(w http.ResponseWriter, req *http.Request) {
	resp, err := http.Get("http://127.0.0.1:8082/test2")
	if resp != nil && resp.Body != nil {
		defer resp.Body.Close()
	}
	if err != nil {
		w.Write([]byte("make request failed\n"))
		return
	}
	io.Copy(w, resp.Body)
}

func main() {
	http.HandleFunc("/test1", TestServer)
	err := http.ListenAndServe(":8081", nil)
	if err != nil {
		log.Fatal("ListenAndServe: ", err)
	}
}
service2.go
package main

import (
	"io"
	"net/http"
	"log"
)

func TestServer(w http.ResponseWriter, req *http.Request) {
	io.WriteString(w, "hello, world!\n")
}

func main() {
	http.HandleFunc("/test2", TestServer)
	err := http.ListenAndServe(":8082", nil)
	if err != nil {
		log.Fatal("ListenAndServe: ", err)
	}
}
这里模拟微服务service1调用service2。
在consul里配置两个服务
在consul的配置文件目录下新建两个json文件,用来配置上述两个服务。
/usr/local/etc/consul.d/01_service1.json:
{
    "service": {
      "name": "service1",
      "port": 8081,
      "connect": {
        "proxy": {
          "config": {
            "upstreams": [{
               "destination_name": "service2",
               "local_bind_port": 38082
            }]
          }
        }
      }
    }
  }
/usr/local/etc/consul.d/01_service2.json:
{
    "service": {
      "name": "service2",
      "port": 8082,
      "connect": {
        "proxy": {
        }
      }
    }
  }
然后执行命令重新加载consul的配置
consul reload
修改service1中引用service2的代码:
......
func TestServer(w http.ResponseWriter, req *http.Request) {
	//resp, err := http.Get("http://127.0.0.1:8082/test2")
	resp, err := http.Get("http://127.0.0.1:38082/test2")
	if resp != nil && resp.Body != nil {
		defer resp.Body.Close()
	}
	if err != nil {
		w.Write([]byte("make request failed\n"))
		return
	}
	io.Copy(w, resp.Body)
}
......
跑起来
将service1、service2跑起来,然后用curl命令访问service1
> go run service1.go &> /dev/null
> go run service2.go &> /dev/null
> curl http://127.0.0.1:8081/test1
# 如果出现以下输出,则说明一切正常,Bingo!
hello, world!
其它使用方法
除了Service Mesh的玩法,consul 1.2还提供了SDK的用法。简单来说就是Go语言开发的微服务按照它的规范修改服务提供方、服务消费方的代码,服务间的调用将会自动使用底层的connect隧道。这个使用方法不太符合service mesh的初衷,做过微服务框架sdk的我不是太喜欢,这里就不详细讲了,可以参考官方给出的文档。
consul的service mesh原理分析
其实consul的文档本身说的比较明白,这里结合consul-ui及代码大概分析一下。
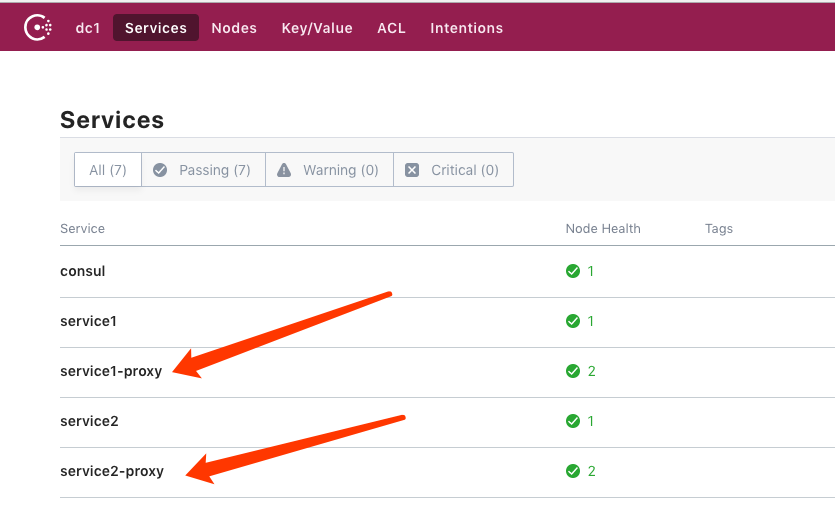
当给consul的服务配置里添加了"connect": { "proxy": { } }后,consul将会为每个服务实例创建一个专门的隧道代理,如下图所示:
隧道代理的作用是当以connect模式连入时,会自动建立一条到原服务实例的tcp隧道,后面tcp层以上的应用协议数据流将在这条tcp隧道上传输,具体代码在https://github.com/hashicorp/consul/blob/master/connect/proxy/listener.go#NewPublicListener。
而涉及服务间调用时,在consul服务配置里添加服务UpstreamListener声明,服务消费方访问服务时需使用UpstreamListener的地址。UpstreamListener实际上是一个反向代理,当访问它时,它会以connect模式连接对应的服务实例Connect Proxy,具体代码在https://github.com/hashicorp/consul/blob/master/connect/proxy/listener.go#NewUpstreamListener。
结合上述两条规则,整个数据链路就通了。
这里有一个问题,为啥一定要connect模式的隧道代理呢?反向代理服务不能直接连接原来的目标服务地址吗?
看了下https://github.com/hashicorp/consul/blob/master/connect/service.go#Dial,大概知道原因了。因为connect模式的隧道代理是使用TLS加密的,这样物理服务器节点之间的网络流量就走TLS安全连接了,再加上intentions机制,服务间的调用安全性上有了很大保障。还有一个原因,如果采用Connect-Native的方式集成consul的service mesh功能,底层连接是TLS,上层就可以很方便地走HTTP/2.0协议了。
consul的service mesh优缺点分析
优点:
直接使用tcp隧道,因此直接支持各类基于tcp的协议代理,如HTTP/1.1、HTTP/2.0、GRPC。
实现原理简单,
https://github.com/hashicorp/consul/blob/master/connect/、https://github.com/hashicorp/consul/tree/master/api/connect*.go、https://github.com/hashicorp/consul/tree/master/agent/connect/下的关键文件不超过20个,逻辑很容易就看清了。直接结合consul做服务注册与服务发现,集成度高。
缺点:
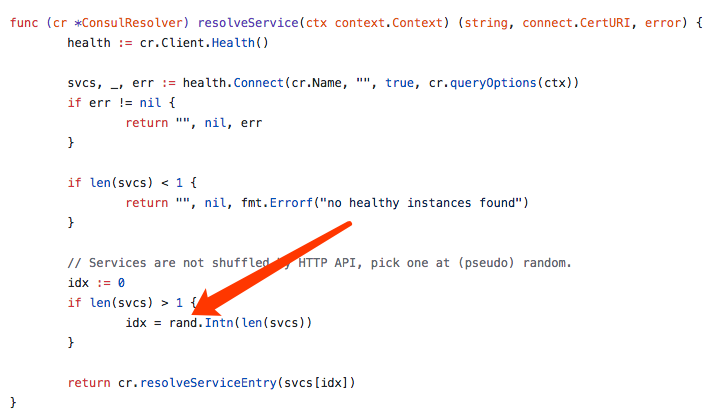
目前的负载均衡算法还很简单,就是随机,见下面:
一些微服务框架的基本功能还不具备,如超时、重试、熔断、流量分配等,可以从
https://github.com/hashicorp/consul/blob/master/connect/proxy/listener.go#handleConn这里开始扩展。需要手动修改consul的服务配置;服务消费方要根据consul里的服务配置,修改调用其它服务的地址(这里跟service mesh的初衷有些不符)。
总结
目前来看consul的service mesh方案还比较简单,功能很基本,但具备进一步扩展的空间,可以好好研究学习它的代码。
参考
- https://www.hashicorp.com/blog/consul-1-2-service-mesh
- https://www.consul.io/intro/getting-started/connect.html
- https://www.consul.io/docs/agent/options.html
- https://www.consul.io/docs/connect/intentions.html
- https://www.consul.io/docs/connect/native.html
- https://www.consul.io/docs/connect/native/go.html
- https://www.consul.io/docs/connect/configuration.html
- https://www.consul.io/docs/connect/proxies.html
- https://www.consul.io/docs/connect/dev.html
- https://www.consul.io/docs/connect/ca/consul.html
文章作者 Jeremy Xu
上次更新 2018-07-06
许可协议 © Copyright 2020 Jeremy Xu